JenLinks

Showing posts with label Decorating. Show all posts

5 Tiny Yet Beautiful Room Ideas

Tuesday, July 10, 2018

Guest post by Ashley Lipman


Who says that small rooms can’t be absolutely stunning? In this modern age of environmental consciousness and freedom from possessions, many of us can benefit greatly from living in tiny houses. These small spaces are far from cramped and they make us realize the comfort of living simply, debt-free, and with the least ecological impact.

Small rooms in small houses still need a good eye for their layout, though. We’ll give you some amazing beautification tips below, specially tailored for your tiny corners!
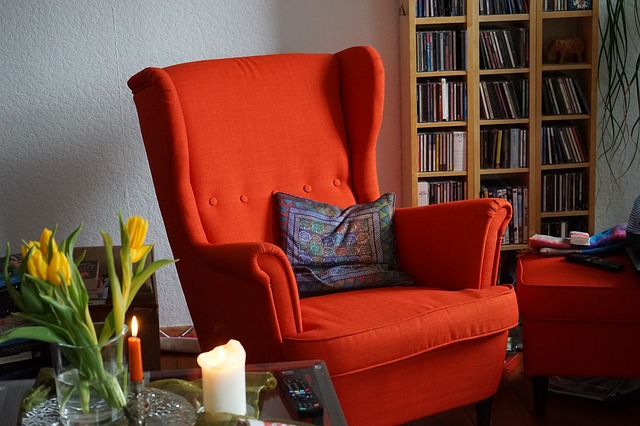
1. Keeping It Cozy

You may feel like keeping your little room as neat and organized as possible. Let’s face it, though; you’re living there, and it’s not going to be all sleek and smart all the time. So why not embrace the natural coziness of your room and make it as comfy as possible?

Go for a plush rug and have seating placed close together. This will make for a cocoon-like nest for you to wrap yourself up in. It’ll be your relaxing haven when you come home and be beautiful in its own unique way.

2. Creating Zones

The Cornelia tiny house by New Frontier Zones is a perfect example of one tiny space encompassing several uses. It utilizes different colors to set different rooms or spaces apart. This way, no one gets confused about what goes where, and the effect is exceptionally beautiful.

The kitchen is painted in a cheerful yellow color to get the appetite going, while the bathroom's a cool green. The rest of the space is a solid wooden background where the few pieces of furniture stand out without overcrowding.

3. Choose A Statement Piece

Many homeowners make the mistake of leaving the big, interesting pieces to the large rooms or areas. The reasoning is that a large item in a small room would only make the room look smaller and more cramped.

However, having a statement vase or bold-patterned rug could actually help pull a small room together. A large rug makes the room feel larger too. This is because it will give a uniform effect to the floor while still lending its charm to the room.

In short, stick to a few large beautiful pieces of furniture and/or decorations. Tiny things in a tiny space will just create a feeling of messy havoc. Splurge on oversized chairs, like a hammock chair, and don’t be afraid of having a chest double as a coffee table!

4. Curtains Should Be Light And Matching

Having light curtains instead of heavy ones will help to keep the light at a maximum within a small room. You should also try having them match your wall color or wallpaper as much as possible.

While we’re on the subject of curtains, you don’t have to limit them to the windows! Curtains could be great for hiding beds during the daytime, or simply for creating a tiny private space if needed.

Since your room is already small, invest in curtains that provide a nice look when on display. They may very well be making the fourth wall of your room for some time!

5. The Jewel Effect

Paint your walls with a dark or deep color in solid tones. Then, make sure your large decorations are in bold and right hues. This will make them pop against the background and create a jewelry box feeling.

You can also make sure your bedding or cushions are made up of bold, striking shades. These will create a much bigger impact inside a small room than larger ones.

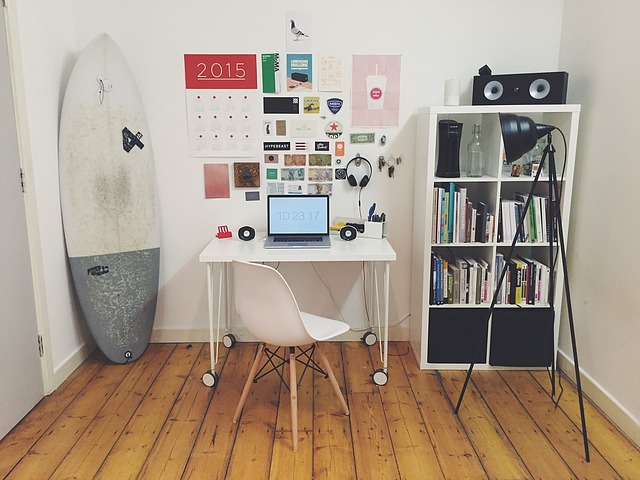
Have a home office or are dreaming of one? You can easily put your tiny room towards this purpose by mounting a slab of wood on the wall. This will save you the space that an actual desk would take up.

You can even make this mounted desk more pleasing to the eye by mounting shelves all around it. This will give you space for showcasing your books, some potted plants, and some tasteful decorative items. Leave the rest of the wall empty, though; it could prove distracting and take away from the beautiful masterpiece you already have up there.

Inspirational Quote Poster and Bathroom Shelf Decor

Tuesday, March 8, 2016

I'm a sucker for inspirational quotes and small start-up companies, so when Pratima contacted me from Craft Street Design to see if I would review a poster, of course I said yes!

I am in love with my poster! Look how cute it was packaged up and mailed!

Confession: I originally chose this quote to go in the kid's bathroom, but when it came in the mail I couldn't part with it and decided to put it in my bathroom instead.

Fun fact: Each design is actually created by hand before it is digitized.


I fell in love with this weathered frame from Michaels, but didn't like the price and have tons of old frames at home. I found an already weathered looking frame in my storage and lightly brushed it with turquoise acrylic paint. After it dried, I sanded it a little and lightly sprayed it with a clear top coat.


I am thrilled with how the frame turned out and think it is perfect for this poster! I wanted a weathered sea look to go with the mermaid quote. This particular quote has a lot of meaning to me and now I get to see it everyday when I step out of the shower and start my day.
Thank you Pratima!


Quick, Easy, and Cheap Custom Ikea Shelves Above The Toilet

Tuesday, September 8, 2015


A quick and easy project that will make a huge difference!

To get this custom look:

2 Ikea Ekby Tryggve softwood shelves for $3.99 each.
2 Ikea Ekby Mans brackets (2 per package) for $7.50 each.
Total price: $22.98

In addition you will need:
Pre-stain (optional)
Stain
Clear protective finish
I used what I already had leftover from various jobs, so I didn't include them in the cost.

Steps:
1. Cut wood shelves to fit.
2. Pre-stain (optional). I like to use pre-stain on all my staining projects because it makes the stain more consistent. Follow manufacturers directions for drying time, mine was only a few minutes.
3. Stain and follow manufactures directions for drying time.
4. Stain again if you want it darker. Follow manufacturers directions for drying time.
5. Turn over and repeat steps 3 & 4.
6. Apply a clear protective finish. Follow manufacturers directions for drying time.
7. Apply a second coat of protective finish and then a third if desired (I only did 2 on the top and 1 on the underside). 
8. Turn over and repeat step 7.
9. Install brackets and screw the shelves onto them.

I spent about 1 hour in labor on this project, but it took a full day for drying and turning over the shelves.


Here is the pre-stain and stain that I used.


Living Room Makeover

Tuesday, November 5, 2013

Welcome to my formal living room. The many windows and open entries into the room made it a challenge to arrange and decorate, but I love a challenge.


It took me 2 years of living in my new house before I could figure out what to do with this room. Once I dedicated some time and money, it came together pretty quickly, and now it is my favorite room in the house.


Click on photo for my post about spray painting the piano. 
http://www.thethriftyhome.com/2013/08/navy-blue-painted-piano.html


I started by choosing a color scheme of navy and lime green. The first thing I bought was the rug from Rugsusa.com (They are not sponsoring this post and all opinions here are my own.) I got my 8x10 foot wool rug for $288 (reg. price $1,152). 


My next big purchase was the couch. I had tried every couch I owned in this room and none of them worked. This room needed a large customizable couch which I found at Costco for $1,000. I had fun playing around with tons of different arrangements before finding one that worked for my room.


My next purchase was the curtains. I love this Waverly print that I found at Lowes. I also bought wood corner curtain rods for my 2 corner windows.


For the tall window, I bought some plain, cheap curtains at Ikea and I hot glued ribbon around the edges. Here are the curtains before the ribbon was added.


 I also hot glued ribbon on the lamp shades (I purchased the lamps from Costco).


I had a lot of fun buying different fabric and sewing envelope pillow covers (I bought the pillows at IKEA). I also bought 2 Lack sofa tables from IKEA for my extra long couch.


I love my Pottery Barn station clock that I put between the living and dining rooms.


I took some frames I already had and some from the thrift store and sprayed them with primer. Then I brushed them with simple craft store acrylic paint and sprayed a clear gloss over them.


They look great on my new IKEA bookcase.


Here is the living room when we first bought our house.


Here is the finished living room. 


Navy Blue Painted Piano

Thursday, August 29, 2013


I have always wanted to paint a piano, so when I found an old worn one at the thrift store for $200, I bought it. It had been in a school since the early 1980s and was very worn. I could tell it had been pushed through many tight doors by the bent knobs and scratched sides. I decided to paint it a glossy navy blue.

Soon after I bought the piano, I found the bench at a different thrift store. I knew that once painted it would look like it always belonged with the piano.


Later I found this magazine rack for $3 at the thrift store and I spray painted it a glossy lime green. It works perfectly as a music rack.


I had a lot of fun creating this gallery wall above the piano using photos from our recent trip to Northern California.


Here is how I did it:

I started off by unscrewing the pieces of the piano. It was easy to see how the keys came out after taking the cover off and they were all numbered which made keeping them in order easy. After I pulled out the keys, I laid them out on the table and cleaned them up.
This piano had been in a school for many years and had a lot of garbage under the keys. After removing the garbage we carefully used an air compressor to blow out the dust in all the areas of the piano.
We taped up everything we didn't want painted and filled in all of the big gashes and scratches.
I tried 3 different colors out before deciding on the navy blue. Later I used the light blue to spray a frame for the gallery wall and the green to spray the magazine rack featured.

We sprayed it inside since there is no way just the 2 of us could carry that thing outside. We made sure to seal off the room we used, cover everything, and open windows. The spray paint still made lots of dust for me to clean in other rooms, but could have been worse. All of the parts that could be removed from the piano were taken outside and sprayed.

We used 2 cans of Rustoleum spray primer and sprayed one coat. It dried quickly and we were able to spray the first coat of paint after an hour.
We made the huge mistake of using Valspar spay paint from Lowes for the first coat. We followed the instructions and shook the can for 15 minutes, but the paint was very inconsistent coming out light blue in some places and then dark blue in others. I went online and found that many people have complained about this issue with the Valspar spray paint line. Lowes refunded our money and we bought Rustoleum Navy Blue gloss spray paint. We used 6 cans of spray paint and applied 2 coats.
I also sprayed the bench and covered the top with new fabric.
I got the cute knobs at Hobby Lobby.


Total cost for the piano:
$200 piano
$40 primer and spray paint
$5 new knobs

I used these Command picture hanging strips to hang all of the pictures on my wall. I didn't have to put any holes in the wall and they made the job 10X faster and easier. I will never use a nail or screw to hang a picture again (This is my own opinion and I was not paid to endorse Command Strips).

The gallery wall is made up of frames I already had, a few frames from the dollar store and thrift store, and a plate holder featuring photo books.


I'm linking up to these parties:
Tuesday
Elizabeth and Co.
One Fine Wire
Wednesday
Handy Man, Crafty Woman

Adorned from Above 
Ivy and Elephants 
Thursday
Catch a Glimpse Thursday
Transformation Thursday (The Shabby Creek Cottage)
Sweet Haute

Friday
The Shabby Nest
At The Picket Fence
My Romantic Home
The Pin Junkie
Jennifer Rizzo
WhipperBerry

Girl's Room Desk

Sunday, March 14, 2010


When I decorated my daughter's room a couple of years ago I looked everywhere for a cute little desk. They were all so expensive and I found that $250 would only buy me a cheap particle board desk. I finished her room without the desk, but later found one at the thrift store for $10. It was all wood and the perfect size for a little girl's room.
I used wood putty to fill in scratches and holes and then lightly sanded it with a palm sander. I painted the desk white with some paint I already had. Then I bought a sample can of paint at Lowes for $2.98 and had it tinted pink. Buying a sample can of paint is a great idea when you just need a small amount for a project and they will tint it any color you want.
I used the pink paint on the drawers and spent $2 on new wood knobs. For a total of $14.98 I got the perfect desk that will last for many years and my daughter is very happy.

Update:
I have since painted this desk again: